Brewing beer is a bit like growing a garden – it takes time, so you need to plan ahead and then wait patiently for the fruits of your labour. So even though I’ve just bottled 20 litres of beer, it will be weeks before it’s ready for drinking and months before it reaches it’s prime, so in the meantime I’ve got to sow the seeds for next batch. While my first batch was fermenting I had already purchased supplies for my second batch. I went to Bin Inn (the only place in Nelson that sells home brewing supplies) to pick out something to brew next and got a can of Blackrock East India Pale Ale and some BrewCraft beer enhancer (English Bitter No. 70).
The night after bottling batch 1, I got to work on getting my IPA kit brewing. Despite having absorbed a lot more information and tips about brewing since the first time around, it did not exactly go as smooth as I’d hoped.
Leaking Tap

Time to improvise
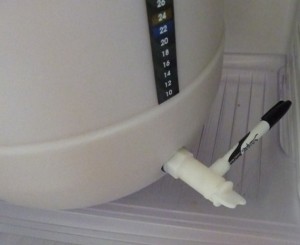
The biggest problem I hit was that I discovered my fermentor tap had a drip. I noticed it when I had sanitiser solution sitting in the fermentor. I tried fiddling around with the position of the tap handle. At times I thought I got it into a position where it didn’t drip anymore only to discover a little water drop under the spigot a few minutes later. It was a bit of a worry. Maybe it wouldn’t matter much, but over the course of 2 weeks and with the additional pressure of fermentation, that tiny drip could add up to something significant or worse still, compromise the safety of the batch. I was thinking maybe I should abort and hold off until I got a replacement tap but I was really eager to get on with it. Then I thought a possible solution to the problem could be to plug the spigot outlet, so the search was on to try and find something that would fit perfectly into the spigot hole. It took awhile to come up with something suitable but in the end a sharpie marker did the trick. The drip was stopped and it was on with the show.
I did actually find out the likely cause of the drip – my wife informed me that she had seen my 2 year old standing on the tap when he was pulling out the airlock! (Luckily she was there to avert a total disaster)
Pitching Temperature Not Optimal
I had decided to add less water when making up the batch in order to attempt to make a stronger tasting beer – fill to 18L instead of 23L. As a result I ended up with a wort temperature of 28C, a bit on the high side for pitching yeast. But it was getting late and I didn’t have ice on hand for rapid cooling so I went ahead and pitched the yeast at 28C. Next time I’ll have to be more careful with the wort temperature.
Oops, no OG Reading
I had actually sanitised a jug to take a sample for measuring the specific gravity but the yeast was pitched, the lid on and airlock in place before I thought of doing it. I had done the same thing on my first batch but when I thought of it I took a sample from the tap. But this time with the precarious state of the tap (bunged up with a sharpie), I thought ‘bugger it, I’ll just leave it’. It would be nice to know the OG but it’s not going to change anything. Another thing to make sure to remember to do next time.
So I stuck the fermentor into my spare fridge and left it to ferment. I was targeting a fermenting temp of around 22C, so I set the fridge on the lowest setting and it cooled overnight to around 21C and it was bubbling strong when I checked it in the morning.
Lessons Learned
- Kids and fermentors don’t mix
- Make a checklist so that no steps are accidently missed
- Remember to check OG before pitching the yeast
- Plan for getting wort to optimal temperature for pitching

4 pings